TraceYourProj’s Developer Guide
Table of Contents
1. Introduction
2. Design and Implementation
2.1 Design
2.2 Implementation
Add projects and resources
List all projects & their respective resources
List all the resources for a particular project
Deleting resource from a specified project
Editing resource from a specified project
Finding resource(s) in a project or all projects based on a keyword
Exiting TraceYourProj
Saving and loading data
3. Product Scope
3.1 Target user profile
3.2 Value proposition
4. User Stories
5. Non-Functional Requirements
6. Glossary
7. Instructions for Manual Testing
Introduction
TraceYourProj is a desktop app for tracking online resources for data science projects, optimized for use via a Command Line Interface (CLI).
Design & Implementation
Design
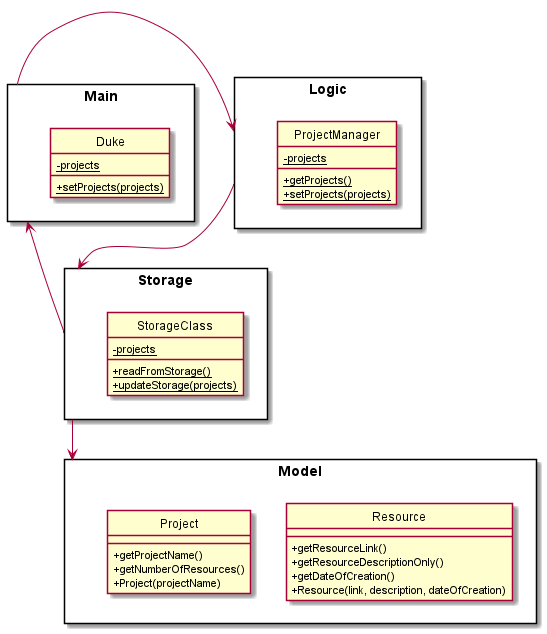
Architecture
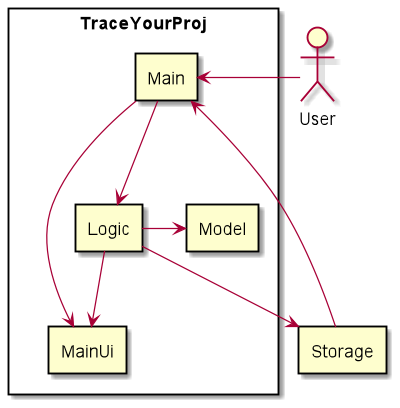
The Architecture Diagram provided above illustrates the high-level design of TraceYourProj. Given below is a quick overview of each component.
Main is consisted of a class, namely Duke. The main function of it is to receive inputs from the user until he/she types exit command to terminate the program.
The rest of TraceYourProj comprises the following components:
MainUi: The user interface of the application.Logic: The core of the application that is to execute commands from the user.Model: It stores the data of the application in memory.Storage: It reads/writes the data from/to the hard disk (local file system).
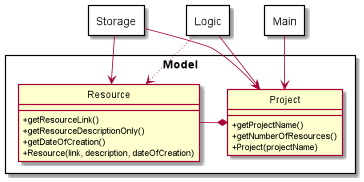
Overall Class Diagram:
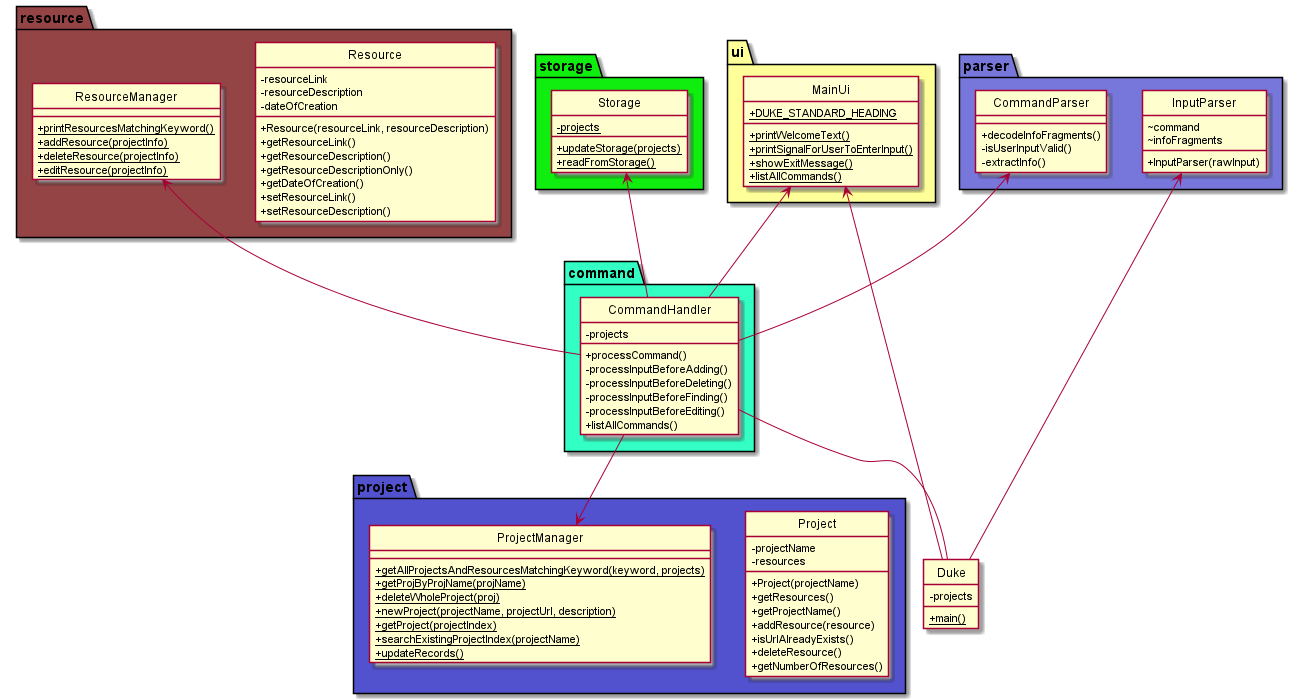
The above shows the class diagram and relations of the classes.
MainUI Component
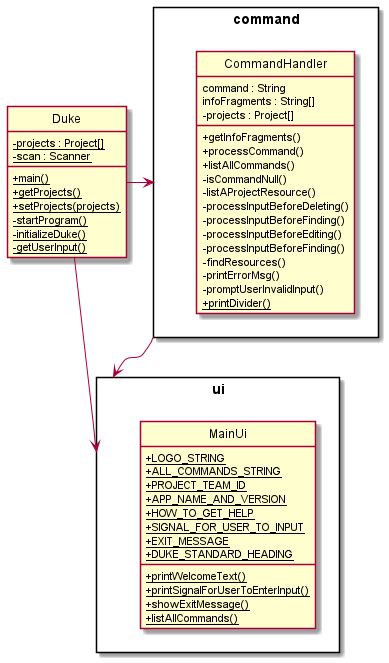
API: MainUI.java
The MainUI Component
- handles interactions with the user upon running TraceYourProj such as prompting user input and showing a list of available commands
Logic Component
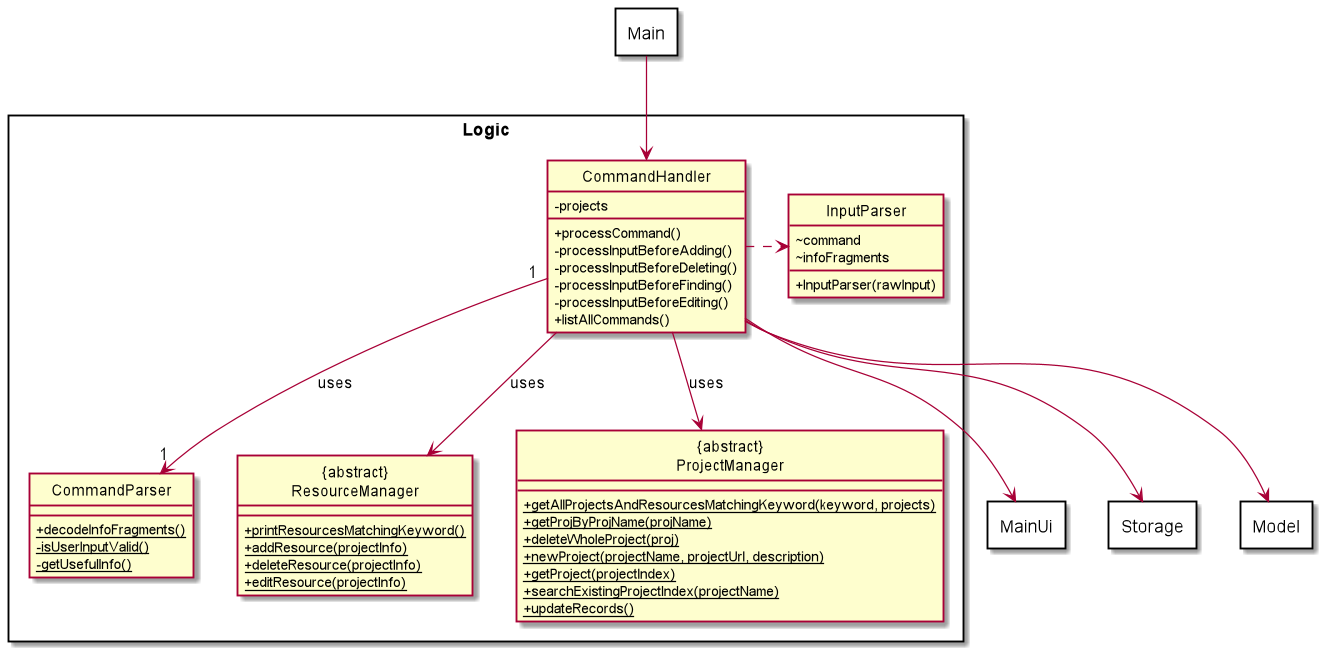
API: CommandHandler.java
The Logic Component
- The API of
Logicis the class CommandHandler. - Class
CommandHandleruses classCommandParserto parse infoFragments from classInputParserwith suitable keywords. - The parsed arguments would be passed to suitable classes (
ResourceManager/ProjectManager) for command execution. - Class
ResourceManager/ProjectManagerexecutes user command based on the parsed arguments. - The Model may be modified during command execution. (e.g. added/deleted a resource)
- data.txt, a local text file, may be created/modified during command execution. (e.g. save a project list)
Model Component
API : Project.java
& Resource.java
The Model Component
- A Project object stores an array of Resource objects. Each resource object represents an online resource added by users.
- stores the Projects & Resources data.
- does not depend on any of the other three components.
Storage Component
API: Storage.java
The Storage Component
- converts
ResourceandProjectobjects as strings into the storage text file, when thesavecommand is called. - converts
ResourceandProjectobjects from strings from the storage text file, when theloadcommand is called. projectsinstance inDukeandProjectManagerare updated onloadprojectsinstances fromProjectManagerare saved uponsave.
Implementation
This section describes some noteworthy details on how certain features are implemented.
Add projects and resources
Proposed Implementation
Given below is an example usage scenario and how the add mechanism behaves at each step.
Step 1: The user launches the application. The project list of the application will be initialized as an empty list.
Step 2: The user executes the following commands in order to add a resources to a project.
add p/CS2113 url/www.traceyourproj.com d/Project Website
The following sequence diagram shows how the add operation works:
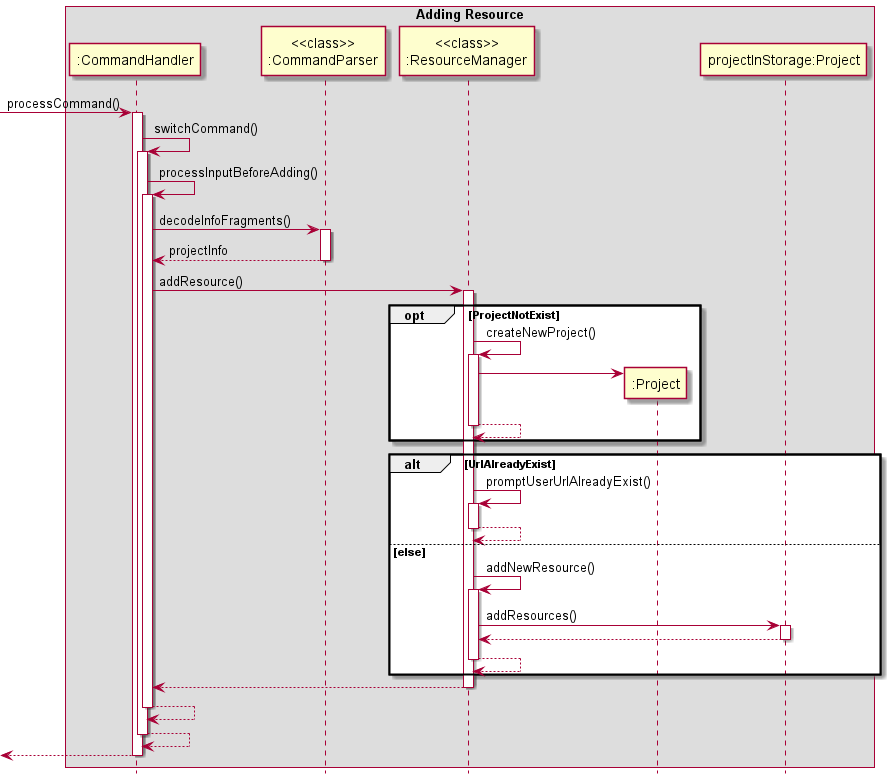
The arrow pointing from «Class»:ResourceManager to :Project should be pointed at the middle of :project. However, due to limitation of PlantUML, the arrow is pointed at the left-hand corner of :Project.
projectInStorage:Project represents a project that is already existing in the project list of the program.
Design Consideration
Aspect: How add executes
- Alternative 1 (current choice):
-
The add feature will do a loop through all the projects in the ArrayList “projects” to see if the project has already existed. For each project, it will loop through all the resources to see if a resource with the same URL has already existed.
If the project does not exist in the ArrayList:
- Create a new project and append the resource into its resource list.
If the project does exist:
- If resource with the same URL exists:
- Prompt the user that the resource with the same URL has already existed in the project’s resource list.
- If resource with the same URL does not exist:
- Append the new resource into the project resource list.
-
- Alternative 2:
- Only allow users to add resources into projects that are already existing.
- Cons: A new command has to be added for creating new projects before adding resources to them. This requires unnecessarily more lines of code for the implementation and make the program less user-friendly since users need to type extra commands to create projects before adding resources.
- Only allow users to add resources into projects that are already existing.
List all projects & their respective resources
Proposed Implementation
Given below is an example usage scenario and how the list-all mechanism behaves at each step.
Step 1: The user launches the application for the first time. The application’s initialised database will be empty at the start.
Step 2: The user executes the following command in order to add a certain project’s resources.
add p/CS2113 url/www.traceyourproj.com
add p/CS3223 url/www.kaggle.com
Step 3: The user wishes to see the list of resources for all projects. He executes the following command to see them.
list-all
Design Consideration
Aspect: How list-all executes
- Alternative 1 (current choice):
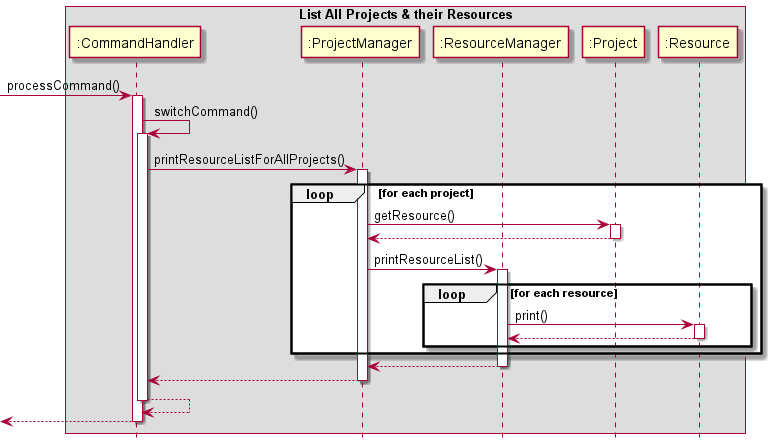
- This list-all feature will do a loop through all the projects in the projects arraylist. For each project, it will loop through all the resources and print it out.
- Alternative 2 (none)
The following sequence diagram shows how the list-all operation works:
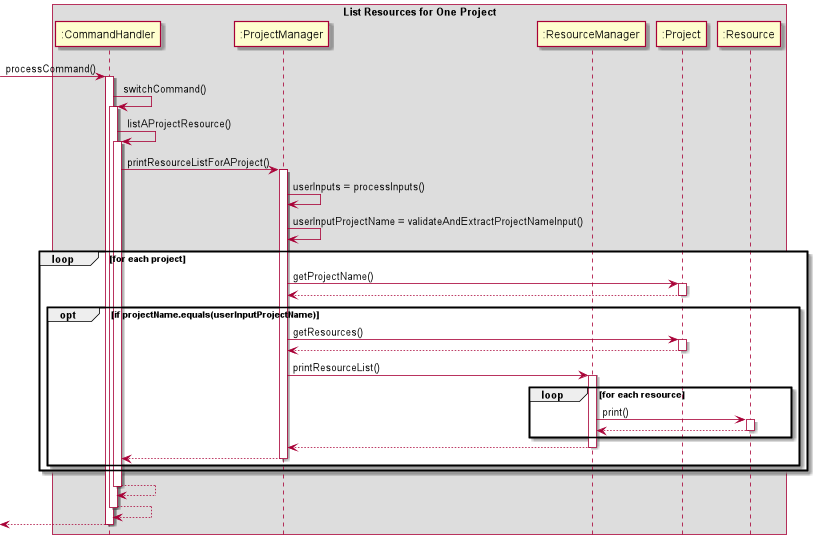
List all the resources for a particular project
Proposed Implementation
Given below is an example usage scenario and how the list-all mechanism behaves at each step.
Step 1: The user launches the application for the first time. The application’s initialised database will be empty at the start.
Step 2: The user executes the following command in order to add a certain project’s resources.
add p/IT3011 url/www.apple.com
add p/CZ2003 url/www.google.com
Step 3: The user wishes to see the list of resources for one project, CZ2003. He executes the following command to see them.
list p/CZ2003
Design Consideration
Aspect: How list p/PROJECTNAME executes
- Alternative 1 (current choice):
- This feature will do a check to see if the project exists first. If it exists, it will do a loop through all the resources for this project and print it out.
- Pros: When there is an error, we will know if the error is due to the fact that the project does not exist.
- Alternative 2:
- Print the project’s resources straight away without checking if project exists.
- Cons: Harder to pinpoint the cause of the error if an error is thrown.
The following sequence diagram shows how the list p/PROJECTNAME operation works:
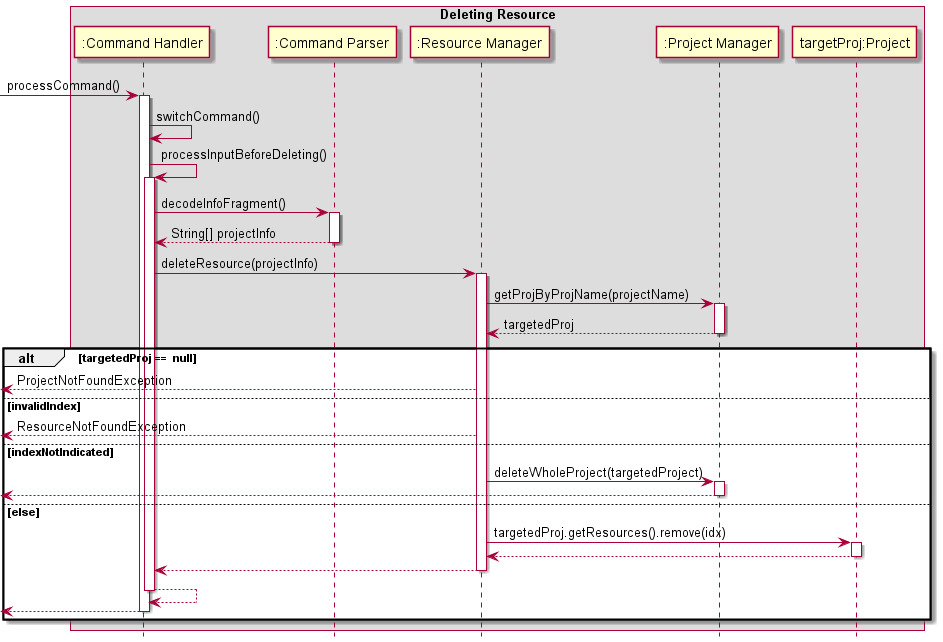
Deleting resource(s) from a specified project
Proposed Implementation
Given below is an example usage scenario and how deleting resource(s) works.
Step 1: The user launches the application. The application state is initialised by the Storage class which reads the text file.
Step 2: The user executes the following command to delete the 2nd resource in the resource list of the project ‘CS2113’.
delete p/CS2113 i/2
Note :The user can also choose to delete all the resources in a specified project and the project entirely,
just by not specifying the index argument.
For example, the user can execute the following command to delete the project ‘CS2113’ entirely.
delete p/CS2113
Step 3:
- If PROJECT_NAME is not found in the database, the application prompts the user that the project is not found.
- If INDEX is invalid (i.e. negative integer or exceeds the number of resources in that project), the application prompts the user to reenter a valid index.
- Else, the system feedbacks to the user that the specified resource has been successfully deleted.
Step 4:
The user can execute list p/CS2113 to verify that the specified resource has been deleted from the project.
The following sequence diagram shows how the delete operation works:
Design Consideration
Aspect: How delete executes
- Alternative 1 (current choice):
- Allows user to delete the entire project by not specifying index argument.
- Pros: Makes deletion of entire project much faster and efficient.
- Alternative 2:
- Separate command for deleting the entire the project
- Pros: Less prone to errors.
- Cons: It increases the complexity of the application and user has to remember more commands. It is also less efficient.
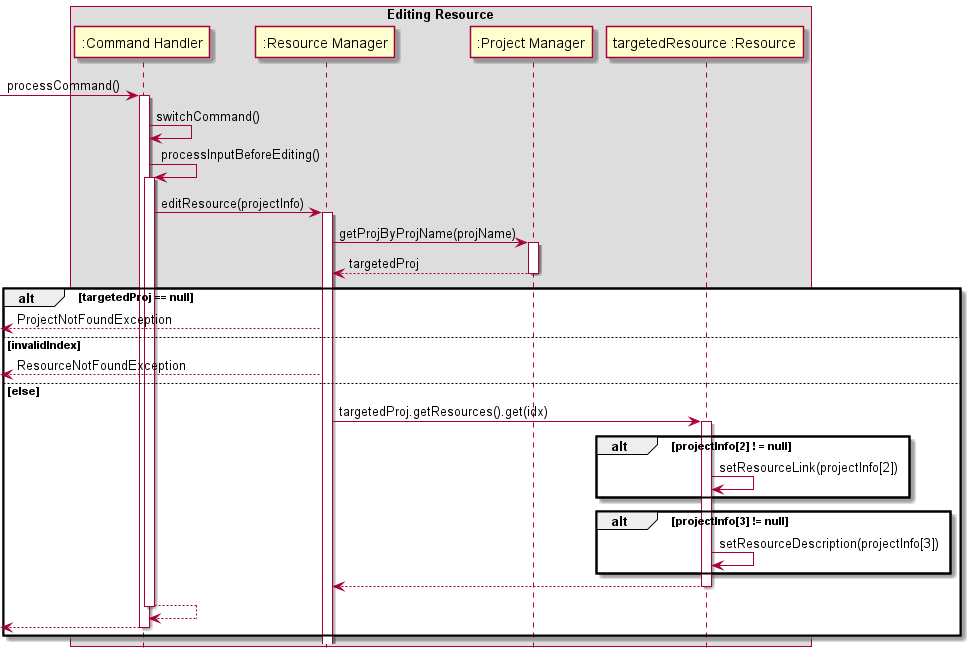
Editing resource from a specified project
Proposed Implementation
Given below is an example usage scenario and how editing a resource works.
Step 1: The user launches the application. The application state is initialised by the Storage class which reads the text file.
Step 2: The user executes the following command to edit the url and link description of the 3nd resource in the resource list of the project ‘CS2113’.
edit p/CS2113 i/2 url/www.CS2113tp.com d/This is tp site.
Step 3:
- If PROJECT_NAME is not found in the database, the application prompts the user that the project is not found.
- If INDEX is invalid (i.e. negative integer or exceeds the number of resources in that project), the application prompts the user to reenter a valid index.
- Else, the system feedbacks to the user that the specified resource has been successfully edited.
Step 4:
The user can execute list p/CS2113 to verify that the specified resource has been successfully edited.
The following sequence diagram shows how the edit operation works:
 —
—
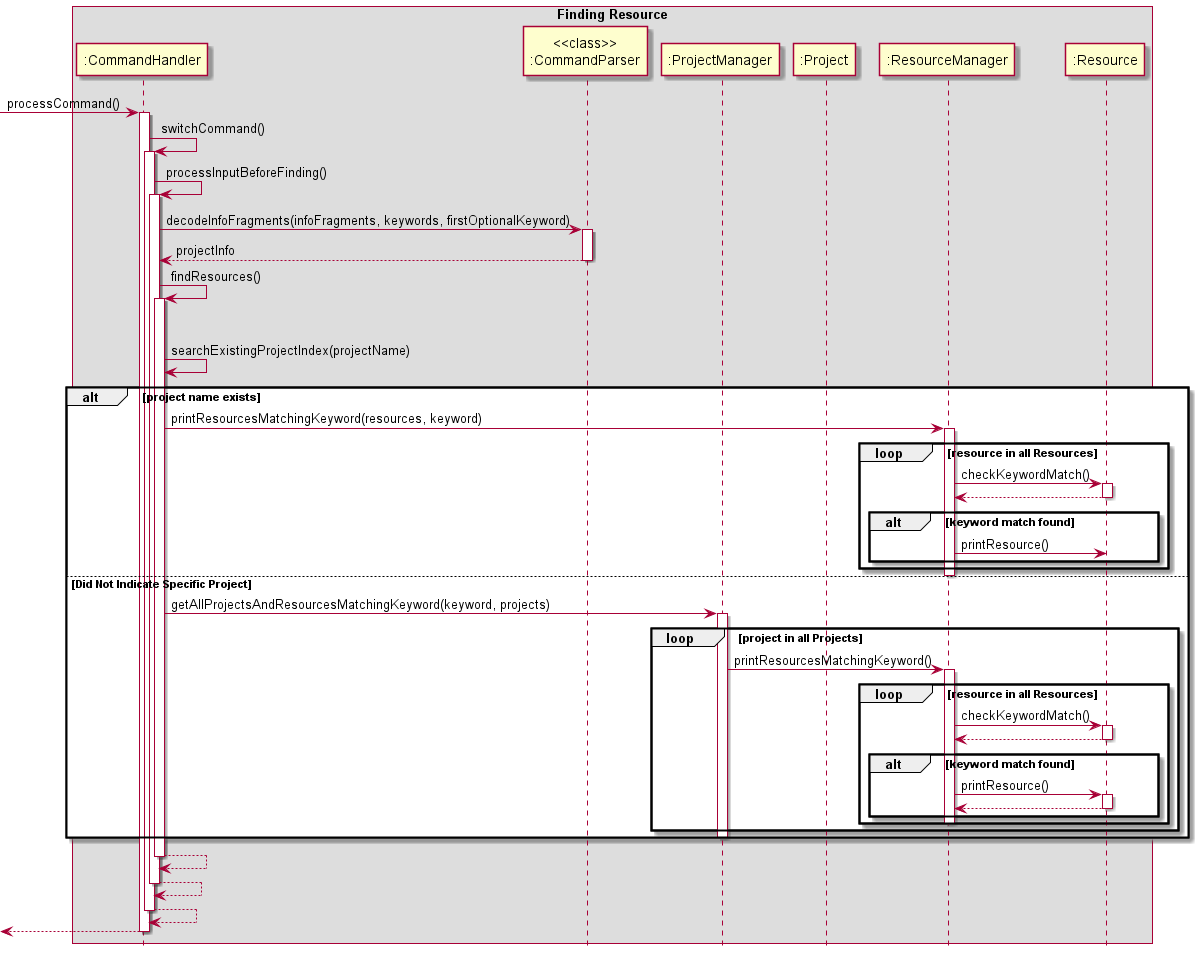
Finding resource(s) in a project or all projects based on a keyword
Proposed Implementation
Given below is an example usage scenario and how the find mechanism behaves at each step.
Step 1: The user initialises the application and adds the resources, Project and Resource objects are created accordingly.
Step 2: The user wants to find resources that match a keyword website in his project CS2113. He executes the following command to print out a list of resources in CS2113 that match the input keyword.
find k/website p/CS2113
Step 3: If the project name cannot be found, the user will be prompted to search for a valid project name. If the project name is not given, such as in the following command, all projects will be searched to find resources matching the keyword.
find k/website
The following sequence diagram shows how the find operation works:
Design Consideration
Aspect: How find executes
- Alternative 1 (current choice):
- Allow the user to input find k/KEYWORD p/PROJECTNAME or find k/KEYWORD based on whether he wants to find relevant resources in a single project or all projects.
- Pros: Fewer commands for the user to choose between. Simple to implement.
- Alternative 2:
- Allow the user to input 2 separate commands find p/PROJECTNAME k/KEYWORD and find-all k/KEYWORD based on whether he wants to find relevant resources in a single project or all projects.
- Pros: Simple to implement.
- Cons: More functions and code required.
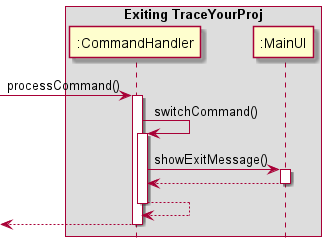
Exiting TraceYourProj
Proposed Implementation
Given below is an example usage scenario and how the exit mechanism behaves at each step.
Step 1: The user initialises the application and adds the resources, Project and Resource objects are created accordingly.
Step 2: The user has finished using the application and wishes to exit the application. He executes the following command to leave the application.
exit
The following sequence diagram shows how the exit operation works:
Design Consideration
Aspect: How exit executes
- Alternative 1 (current choice):
- Break out of do-while loop in the main function in Duke when boolean condition isLoop is no longer true.
- Pros: Easy to implement.
- Cons: Possibility of entering an infinite loop if not properly coded.
- Alternative 2:
- Execute System.Exit(0) when exit is executed.
- Pros: Easy to implement.
- Cons: Reduces testability since more code is required to throw an exception when System.exit is called and catch that exception, so the JUnit test does not fail.
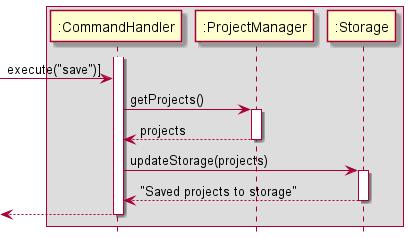
Saving and loading data
Proposed Implementation
Given below is an example usage of how the saving and loading functionality works.
Step 1: The user initialises the application and adds the resources, Project and Resource objects are created accordingly.
Step 2: The user issues the save command by typing “save”
Step 3: The Project and Resource objects contents are saved to a text file upon exiting the program
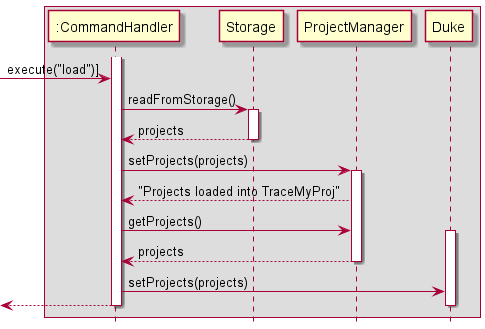
Step 4: The application state can be restored by the Storage class which can read the text file and creates the objects to create an application state when the program starts by issuing the load command by typing “load”
The following sequence diagram shows how the save operation works:
The following sequence diagram shows how the load operation works:
Design Consideration
- Alternative 1:
-
Save upon exit, load upon startup.
- Pros: Easier to implement, program will not have performance issues as it is done at exit.
- Cons: Changes may be lost if the program exits in an unexpected way.
-
- Alternative 2:
- Save and load only if command is issued. (Current choice)
- Pros: Easy to implement, user has freedom of choice whether to save and load.
- Cons: User may not be aware of the functionality without referring to the user guide.
Product scope
Target user profile
- Students doing data science projects.
- prefers desktop apps over other types
- can type fast
- prefer typing to mouse interactions
- is reasonably comfortable using CLI apps
Value proposition
TraceYourProj will help students to keep track of resources (links) which they have previously saved or need to use for their data science project in the future. It allows a single user to use it for multiple projects.
User Stories
| Version | As a … | I want to … | So that I can … |
|---|---|---|---|
| v1.0 | user | add a resource to the resource list | record resources of various projects |
| v1.0 | new user | see usage instructions | refer to them when I forget how to use the application |
| v1.0 | user | exit TraceYourProj when I finish managing my resources | leave TraceYourProj |
| v1.0 | user | see the list of resources for all my projects | recall what are all the projects and resources in the database of TraceYourProj |
| v2.0 | user | tag the resources along with its “modified” date | know when the resources are created/modified |
| v2.0 | user | find a to-do item by name | locate a to-do without having to go through the entire list |
| v2.0 | user | find resources I have that are related to a keyword I specify | easily find resources I need without going through each project and resources |
| v2.0 | user | see the list of resources for one of my project | recall what are the resources of one particular project in the database of TraceYourProj |
Non-Functional Requirements
- Should work on any mainstream OS as long as it has Java 11 or above installed.
- A user with above average typing speed for regular English text (i.e. not code, not system admin commands) should be able to accomplish most of the tasks faster using commands than using the mouse.
- Should be able to hold up to 1000 project resources without a noticeable sluggishness in performance for typical usage.
Glossary
- Mainstream OS: Windows, ~~~~Linux, Unix, OS-X
Instructions for Manual Testing
Given below are instructions to test TraceYourProj manually.
NOTE: These instructions only provide a starting point for testers to work on; testers are expected to do more exploratory testing
Adding a Resource
- Adding a resource to a new project
- No prerequisites
- Test case:
add p/CS2113 url/www.traceyourproj.com d/Project Website- Expected: New project
CS2113is created. New resource is added to the project as shown to the user.
- Expected: New project
- Test case:
add p/CS2113 d/Project Website- Expected: No project is created and no resources are added. Error details shown to the user.
- Adding a resource to a project that already exists
- Prerequisites: List all projects and resources using
list-allcommand. At least 1 project in the list with project name CS2113. - Test case:
add p/CS2113 url/www.traceyourproj.com d/Project Website- Expected: No new project created. New resource is added to the existing CS2113 project. Details of resource is shown to the user.
- Test case:
add p/CS2113 d/Project Website- Expected: No resources is added to CS2113. Error details shown to user.
- Test case:
add p/CS2113 url/nusmods d/website c/true- Expected: No resources is added to CS2113. Error details shown to user.
- Prerequisites: List all projects and resources using
Listing Resources
- Listing all resources in all projects.
- Prerequisites: At least 1 project added with 1 or more resources.
- Test case:
list-all- Expected: All projects and resources in each project listed and shown to user.
- Incorrect listing format to try:
list-all x(where x is any input string)- Expected: No projects and resources are listed. Error details shown to user.
- Listing all resources in one project
Prerequisites: At least 1 project with project name CS2113 added with 1 or more resources.- Test case:
list p/CS2113- Expected: All resources in project CS2113 listed and shown to user.
- Test case:
list p/nus(“nus” project has never been added)- Expected: No resources are listed. Error details shown to user.
- Test case:
list(missing “p/” after list)- Expected: Error details shown to user.
- Test case:
list p/(missing project name after “p/”)- Expected: Error details shown to user.
- Test case:
Finding Resources
- Finding resources from all projects based on a keyword
- Prerequisites: List all projects and resources using list-all command. At least 1 project in list with at least 1 resource.
- Test case:
find k/kaggle- Expected: All resources with ‘kaggle’ appearing in the description or url will be shown to user. If no such resources have been added, no resources will be shown.
- Test case:
find- Expected: No resources are shown. Error details shown to user.
- Finding resources from a project based on a keyword
- Prerequisites: List all projects and resources using
list-allcommand. At least 1 project in list with project name CS2113 added with 1 or more resources. - Test case:
find k/kaggle p/CS2113- Expected: All resources in CS2113 with ‘kaggle’ appearing in the description or url will be shown to user. If no such resources have been added, no resources will be shown.
- Test case:
find k/kaggle p/nus(where nus is not a project that has been added)- Expected: No resources shown to user. Error details shown to user.
- Prerequisites: List all projects and resources using
Exiting TraceYourProj
- Exiting TraceYourProj
- No Prerequisites
- Test case:
exit- Expected: Exit message shown to user. TraceYourProj stops running.
Deleting Resource(s)
- Deleting a resource from a specified project.
- Prerequisites: List all the resources in the specified project using list command.
Make sure the project exists and there is at least one resource in that project.
- E.g. :
list p/CS2113
- E.g. :
- Test case:
delete p/CS2113 i/1- Expected: The first resource in the specified project will be deleted.
User can verify this by executing
list p/CS2113command again.
- Expected: The first resource in the specified project will be deleted.
User can verify this by executing
- Test case:
delete p/CS2113 i/4(where CS2113 only has 1 resource)- Expected: Error details (resource not found) will be shown to the user. Prompt user to enter a valid index.
- Test case:
delete p/CS2114 i/1(where CS2114 is not in the project list)- Expected: Error details (project not found) will be shown to the user.
- Prerequisites: List all the resources in the specified project using list command.
Make sure the project exists and there is at least one resource in that project.
- Delete all resources of the project and the whole project from project list.
- Prerequisite: List all the projects in the project list using list command. Make sure the project exists in the project list.
- Test case:
delete p/CS2113- Expected: All the resource in CS2113 will be deleted and CS2113 will be removed from the project list.
User can verify this using
listcommand. CS2113 should not appear.
- Expected: All the resource in CS2113 will be deleted and CS2113 will be removed from the project list.
User can verify this using
Editing Resource
- Editing a resource from a specified project.
- Prerequisites: List all the resources in the specified project using list command. Make sure the project exists and there is at least one resource in that project.
- Test case:
edit p/CS2113 i/1 url/www.cs2113.com d/New link for CS2113- Expected: The url of the first resource in the specified project will be changed to “www.cs2113.com”.
The description of that resource will be changed to “New link for CS2113”.
User can verify this by executinglist p/CS2113command again.
- Expected: The url of the first resource in the specified project will be changed to “www.cs2113.com”.
The description of that resource will be changed to “New link for CS2113”.
- Test case:
edit p/CS2113 i/3 url/www.cs2113.com d/New link for CS2113(where CS2113 only has 1 resource)- Expected: Error details (resource not found) will be shown to the user. Prompt user to enter a valid index.
- Test case:
edit p/CS2114 i/1 url/www.cs2113.com d/New link for CS2113(where CS2114 is not in the project list)- Expected: Error details (project not found) will be shown to the user.
Saving and Loading Data
- Saving data to storage and Loading data from storage.
- Prerequisites: List all projects and resources using
list-allcommand. At least 1 project in list with at least 1 resource. - Test case:
save- Expected: Notify the user that projects are saved to the storage.
- After saving, execute
exitto exit the application. - Run the application again.
Executeload.- Expected: Loaded projects from storage.
Verify that data is loaded usinglist-allcommand.
- Expected: Loaded projects from storage.
- Prerequisites: List all projects and resources using